Showing posts with label house. Show all posts
Sunday, December 17, 2017

the kitchen

The last two months have been pretty chaotic (will that ever not be the case?). Much of the chaos and busyness is due to two factors - ok, really three. 1) Jon has been traveling a lot. 2) We completely gutted and remodeled the kitchen. 3) We have a toddler.

When we purchased our new home in June, we planned to eventually remodel the kitchen. It wasn't terrible, but it was outdated, starting to show its age, and lacked some functionality. I was actually really glad when we found a house that checked all of our boxes, was move-in ready, but still needed a kitchen renovation. When we were house hunting, it was always disappointing to walk into a newly renovated house that wasn't my taste. It would have been hard to rip out a basically brand-new kitchen just because I didn't like the style. However, I had no problem saying goodbye to one that was nearing 17 years.

We planned to live in the home for a year or so before we tackled the kitchen renovation. We were targeting a spring/summer 2018 project...but then I found out I was pregnant. The thought of having a toddler, a newborn, and no kitchen was less than ideal so we fast-tracked the project and started looking into design/build companies pretty much as soon as the moving boxes were unpacked.

August and September were full of design meetings, builder measurements, and shopping for countertops, lighting, appliances, etc. We had to make quite a few decisions in a relatively short amount of time. Luckily, we had a great team helping us out. Our project manager guided us through layout decisions, cabinet ordering, and decision deadlines, but I operated as the designer. All of the aesthetic decisions were made by me with the occasional assist by Jon. It was really fun to play designer, but also a lot of pressure to get everything right! We spent several Saturdays picking out tile, looking at quartz slabs, choosing lighting and hardware, browsing sink styles and faucets, and comparing appliances.

By far, the hardest part was choosing the cabinet paint colors. I knew I wanted gray cabinets and a navy blue island. Because we were ordering custom cabinets, I basically had the entire universe of paint to choose from. I also only had a few days to make the decision. PANIC! It was pretty overwhelming to be responsible for the color of non-returnable cabinets. I think cabinet delivery day was the most nerve-racking because I was terrified of seeing the final result. [Yes, we had color samples I approved, but who can really trust a tiny wood sample?!]

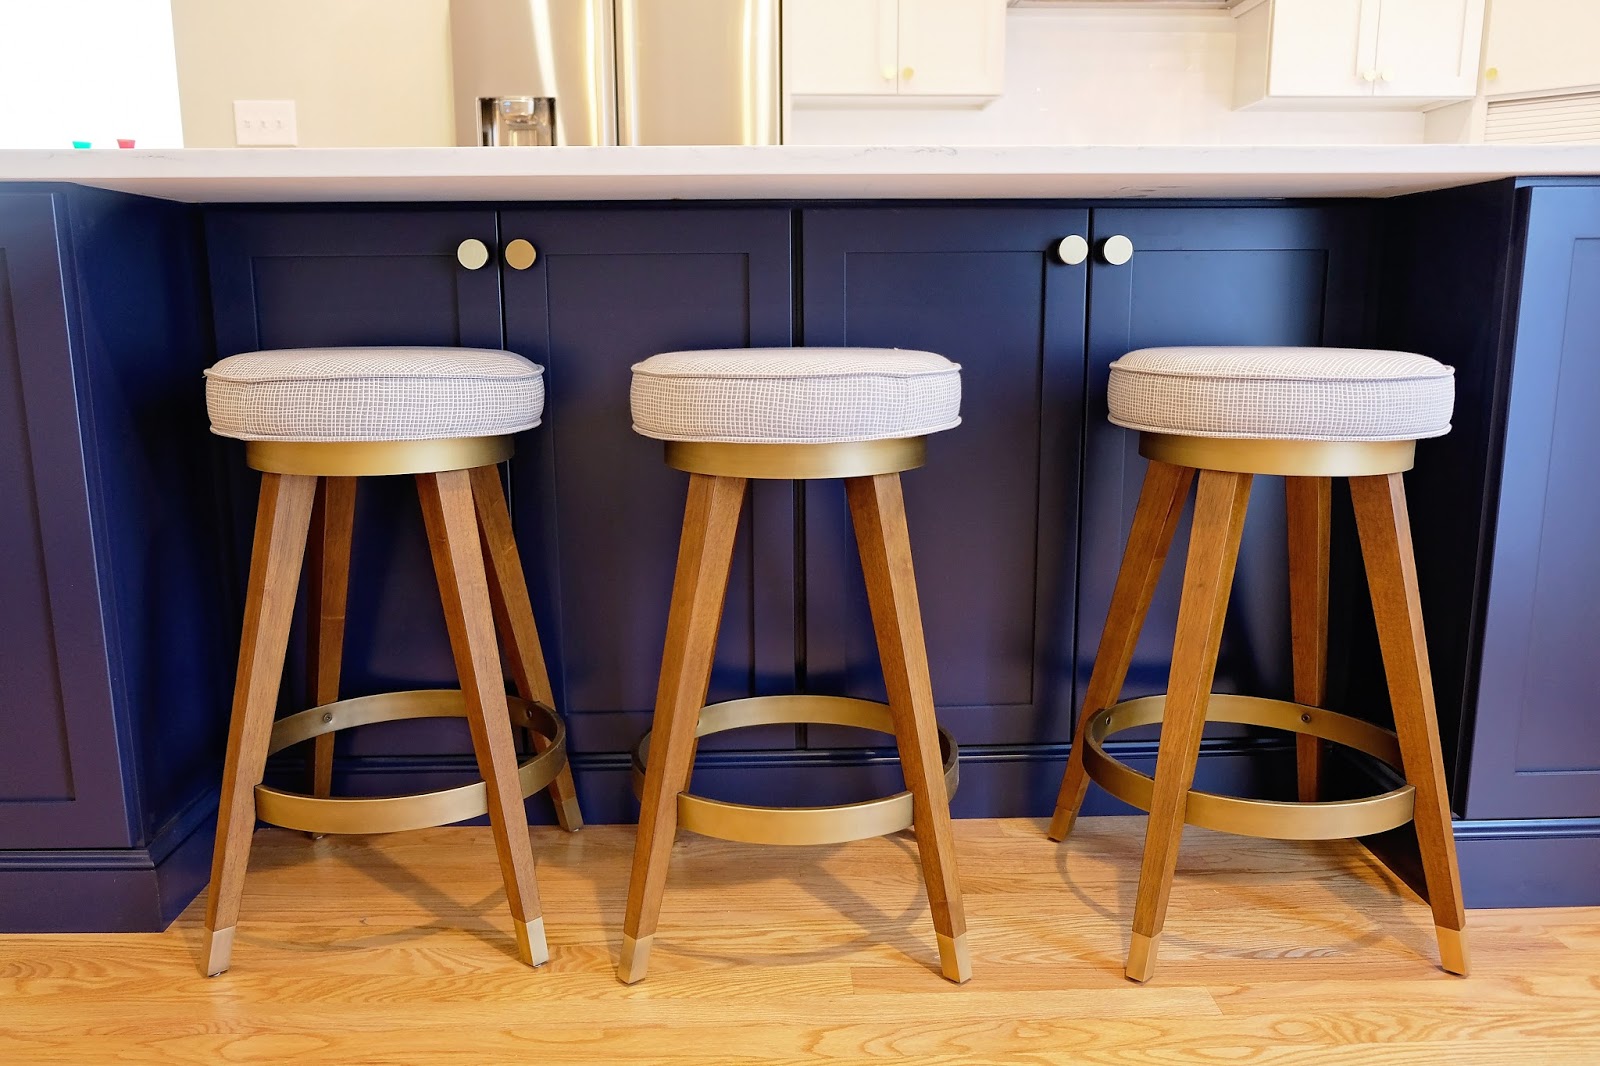
Thank goodness, I'm happy to report that I absolutely love them! The cabinets are exactly what I envisioned. In fact, everything came together just how I wanted. I love the brass accents against the navy blue. I'm also glad I went with gray cabinets over white (there was some peer pressure to just go with white). I like the softer contrast between the navy and gray. I think white would have been too stark. So far, I don't have any regrets. More than one person has commented that the kitchen looks just like me, and I think that's probably the best compliment possible.

While the design phase was exhausting, the actual renovation process was remarkably easy. We somehow managed to stay on time and (mostly) on budget. There were no major issues or problems during the renovation. I'm not even sure how that's possible, but I'm grateful it was smooth sailing. They did great work, and went out of their way to make sure we were as inconvenienced as little as possible. They roped everything off with thick plastic sheeting so dust stayed in and Charlie stayed out. Charlie was curious, of course, but he was largely happy to observe from a distance. His propensity to be shy around strangers worked in our favor in this case.

Demo day was October 16, and they were finished right after Thanksgiving. The worst part was being without half of our main floor during those weeks. While the kitchen was out of commission, we set up our table and fridge in the sitting room. Luckily, we did also have use of our butler's pantry, which meant we had a couple of cabinets for storage, a small countertop and a tiny sink available during the renovation. We ate a lot of crockpot meals (thanks in large part to my mom who stocked our freezer), used paper plates, and made good use of our toaster and microwave.

Now, for the best part. Before, during and after photos. Enjoy!


Demo Day!
The plastic fortress

Our temporary "kitchen"

And dining room 

Somebody really loved all the boxes that were delivered


After the electrical work was done and the floors were newly refinished

Even better than boxes: having our couch in the entryway.
Luckily the couch only had to live here for a couple of days while the floors were being refinished. 

Cabinet delivery!!!


This looks like a great spot to watch Sesame Street, Mom. 


We gained a ton of storage, more useful pull-outs and interior cabinet features, a much bigger island, and an overall much improved layout. The dishwasher moved to the other side of the sink and now I have two ovens (one is located in the island). And if you are wondering where the microwave is, it's a microwave drawer also hiding in the island. I'm also really thrilled to have a pantry. It's not huge, but considering there wasn't a dedicated food storage space pre-renovation, I'll take it. Next to the pantry is a custom spice rack that I designed - it just really makes my heart happy. Oh, and I can't forget my little "garage" where I can keep my mixer and toaster plugged in and ready to go, but out of sight. :)

___________________________________

After photos: The Newborn Lens (the design/build firm paid for professional photos for their promotional use, and I get to use them too!).
Lighting: Schoolhouse Electric 
Hardware: Schoolhouse Electric 
Faucet: Newport Brass
Stools: West Elm
Cabinet Paint: Benjamin Moore Nimbus & Old Navy 
Quartz: Polarstone 
Sunday, January 24, 2016

Charlie's Nursery

The nursery is one of my favorite decorating projects to date. The world of nursery furniture and decor is all kinds of fun, but I also loved this project because deadlines spur action. It was fun to see everything come together so quickly in just a few short months. Even though Charlie will be sleeping upstairs in our room for a while, I'm glad the nursery is all ready for him once he transitions. Ain't nobody got time to finish a nursery when there is a new baby to care for.

We literally changed everything in the room - from the light fixture to the paint to the window coverings to the furniture and decor. Here is a before photo from when the previous owners lived here. We had virtually left the room untouched for 2 years - it had served as storage for a few random things and the last of our moving boxes.


We didn't start doing any serious planning until midway through my pregnancy once we knew the gender. Make no mistake, if this baby had been a girl, there would have been a lot of pink involved (tastefully, I assure you). But once we knew Charlie was on the way, I wanted his room to look like a little man's room. None of this baby blue for us. I had visions of bold colors and graphic patterns. We decided to paint the walls gray to add a calm backdrop to the otherwise bold room. We went through a LOT of paint samples. Gray is impossible, but we finally found just the right shade.


The crib was next. I knew which crib I wanted right away - the only decision was pink or blue once we knew baby's gender. I ordered it sight unseen, but I couldn't be happier. I loved the navy and natural wood mixed together. It's simple and classic, but the two-tone element added just the right amount of interest. On top of that, it was affordable, easy to assemble, and it converts into a toddler bed and twin headboard.


The rocker is from West Elm in a gray basketweave fabric. I sat in a lot of rockers and over-agonized about this decision. It was, after all, the biggest purchase in the room, and a piece of furniture we hope to keep in our home for a long time. I settled on this one because it had the right balance of comfort and style. The fabric is soft, it's great for nursing, and it's easy to maneuver out of while holding a baby in your arms (a hugely important, but often overlooked aspect of rocking chairs). I really love it!


With so much navy and gray in the room, I wanted a contrasting pop of color in the rug to brighten things up. This bold yellow chevron rug from Land of Nod was the perfect addition. I also love the texture of the raised stripes. I think it will make a fun play mat for the trains, planes and automobiles that are surely in our future. Bonus: it also makes a great backdrop for photos!


One of my favorite parts of the room was the book wall. I saw the idea on pinterest and it couldn't have been easier or more affordable. I ordered clear, plastic card shelves from an industrial supplier that we hung by two screws on each end. It was possibly the easiest project of the nursery. The shelves not only provide great storage for tons of books, but it's a fun way to turn a book collection into a work of art. Storage + design feature = win/win. The clear shelves don't take up any visual space so the books add a pop of color without making the wall look too busy.


We already had the dresser, but I gave it a simple makeover by switching out the standard knobs for more fun navy blue ones. It turned into a changing table with the addition of a simple changing pad (this one, which I LOVE and highly recommend). The white shelf above the dresser is another practical favorite. It keeps everything we need organized and right at our fingertips, but out of baby's reach. I realize now more than ever that easy-access open shelving is the only way to go when you have a squirmy baby who needs to be changed.


The final touches were artwork, the mobile, toy bins and plush elephant head. I also re-framed a painting that was painted by a dear family friend when I was born. It's so special to be able to hang that in my little one's room.


Thus concludes the nursery tour. I'm so happy with how it turned out. We invested in the pieces that we can use for many years as Charlie grows and found more affordable options or re-purposed what we already had for some of the more short-term items.


Thursday, September 4, 2014

the stair runner

I am soooooo excited about how this project turned out!! It's been a long time coming, and the end result was even better than I hoped it would be.

You may remember that a couple of months after we moved in, Jon took a little tumble down the stairs and broke his ribs. Turns out bare wood floors and socks aren't a good combination. Since then, we've been planning on adding a stair runner. We wanted the safety factor, but I also loved the idea of adding some design interest to the otherwise plain, boring stairs.

The problem is that we have a lot of stairs. The two upper staircases that connect the three main floors of the house are within eyesight of each other and you see them as soon as you open the front door. Whatever we chose to cover them with would have a major design impact on the entire house. I was completely overwhelmed by choosing a stair runner that would set the tone for everything else in our home.

It all started with a little entry rug.
Enter the Dash & Albert zigzag rug. My In-Laws bought us the 2'x3' version of this rug to use as our front door mat last fall. I walked by it every day for at least 6 months before the lightbulb finally went off - I should use that rug to cover the stairs!

I mean, why not?! I knew I loved the rug and how it looked with our wood floors. I loved the colors and graphic chevron pattern. Not to mention that since the rug had been serving as our heavily used front door mat for months, I could vouch for it's high quality and excellent dirt-hiding abilities. Luckily for me, the rug came in a runner length, and it was the exact width I needed for my stairs. I was so happy I almost cried.

I called my favorite carpet installer to see if it would be possible to retro-fit the rug as stair runner. He said he could make it happen so I ordered six (6!) rugs and crossed my fingers. This was either going to be really great or really horrible.

Installation day was a bit nerve-racking. Per usual, we ran into a few minor glitches. I was nervous so I hid downstairs and vowed not to look until they were finished. Ta-Da! It looked amazing! They did such a great job matching the pattern and retro-fitting six individual rugs to look like one seamless stair runner. I was completely blown away. It also helped that the installers loved it too. The poor guys were thrilled to be installing something other than the norm beige carpet.
Now that wall nook is just dying for some attention.
Don't worry, little buddy, I haven't forgotten about you.
These colors. Swoon.
The 2nd staircase leading up to our master bedroom got some runner love too.
Getting dizzy yet?
It makes such a fun statement. My stairs went from boring to fab in one afternoon. Since the rug is a flat woven wool, it also has great traction. Looks great + added safety = win, win. Now I plan on using the colors in the rug as a starting point for the color schemes of the living room and dining room. It's almost more inspiration than I can handle.

I really didn't know I could gush this much about a rug, but apparently I can. I think I'm just proud of myself for pulling the trigger on a bold design. Playing it safe is for the birds. I'm so happy I took the chance. I love walking into my home. It makes me happy to have a space that is really starting to reflect our personality. If you are having trouble being brave....just go for it. You might surprise yourself.
Tuesday, July 8, 2014

restor-a-finish dresser

We had a bit of an interruption, but it's time to talk about that stacked dresser.

As you may remember, the dresser looked like this when we found it at the barn sale. It wasn't in bad shape, but it needed a little love. There were no major scratches or defects - mostly it had lost it's luster after years of neglect.


We [we = me & Megan. Jon wanted no part in this project] toyed with the idea of completely refinishing it & painting it, but I couldn't settle on a color, and I don't always love the look of painted furniture. And if I'm being completely honest, I didn't trust my refinishing skills.

On top of that, I'm not sure what the long-term plan is for this dresser. Right now, it's going to live in an upstairs guest room that isn't finished yet (and when I say it isn't finished yet, I mean the only thing in there is this dresser). I hated the idea of going to the trouble of refinishing it before I was 1) committed to a color and 2) committed to it's permanent place in our home.

Thus enter Howard's Restor-a-Finish. I first came across this product on Pinterest. After extensive blog research, it seemed like a miracle product. We really didn't have anything to lose - if we didn't like the end result, we could always go back to Plan A: a complete refinish.


We purchased the restor-a-finish at Home Depot. I think it cost around $10. We bought 2 colors to try - walnut & dark walnut - but we couldn't tell a difference between the colors once they were applied. The process of applying the restor-a-finish couldn't have been easier. We just rubbed it on gently with 0000 steel wool and wiped it off. No waiting, no stripping, no elbow grease. The hardest part was pulling out all of the drawers. Ha! We followed the restor-a-finish application with another Howard product called Feed-n-Wax (also purchased at Home Depot), which you rub in & let sit for 30 minutes before wiping off any excess.


now which drawer went where??? 
almost there! we were smart enough to not put all the drawers back in until we had the hardware installed so we could easily pull them back out again.
The final step was replacing the hardware. We raided Anthropologie's hardware section, and we just couldn't decide so we got 15 different ones! I love the charm of the non-matching knobs. It's perfect for the vintage vibe of this old dresser.

i won't tell you how long it took for us to agree on a knob pattern we liked.
those knobs! *swoon*
I love how the knobs look with the camel print I bought in Dubai. Now it's time to get the room painted so I can hang the print above the dresser. 
As you can see, it definitely looks nicer, but restor-a-finish wasn't the miracle worker I hoped it would be. Contrary to the blogs I read and YouTube tutorials I watched, the restor-a-finish didn't make all the scratches or water marks disappear. What it did do is enhance the natural shine and color of the dresser's existing finish. What was a dull & drab finish, now looks more rich and hydrated. I would definitely recommend the Feed-n-Wax. It really helped put the finishing touch on the dresser.
some minor scratches didn't come out.
 luckily, you don't notice them unless you are really looking.
Overall, I'm happy with how it turned out. I may decide to completely refinish it someday, but since it looks fine as is, I'll probably get lazy and just leave it.